
From the previous two posts, we got some basic ideas about all 4 parts of an ELF binary i.e. executable header, program header, section, and section header. Now we will try to modify the binary as per our need. But that is not easy as it sounds, because any wrong modification in ELF can corrupt the whole binary.
There are many ways to hack a binary, for example, modifying binary upcode with hex editor, or modifying shared library behavior using the "LD_PRELOAD" environment variable. But this post will be dedicated to the code section injection technique. In this technique, we will add some extra code inside the existing binary and we redirect the call to the starting address of the injected code, so it can be called throughout the execution. Just adding some extra bytes at the end of the binary will not work, we also need to add a section and program header for the newly injected section to make it work. But there is a problem that the program header is located right after the executable header as we discussed in part-2. So adding a new program header would shift all the sections and headers that come after it. To avoid such complex shifting we can simply overwrite the existing section and program headers (which are non-essential) with the new one. let’s explore how to inject a completely new code section into an ELF binary.
Making of an injectable section:-
Before injecting the code section, it's important to know how to make the injectable code section. Because a full-fledged ELF binary that contains headers and other overhead is not needed for the injection. we just need the .text section of an elf file as we are considering overwriting an existing program and section header. we'll write a simple assembly code that prints a hello message in Intel syntax, intended to be assembled with the nasm assembler in 64-bit mode.
BITS 64
SECTION .text
global main
main:
push rax ; save all clobbered registers
push rcx ; (rcx and r11 destroyed by kernel)
push rdx
push rsi
push rdi
push r11
mov rax,1 ; sys_write
mov rdi,1 ; stdout
lea rsi,[rel $+hello-$] ; hello
mov rdx,[rel $+len-$] ; len
syscall
pop r11
pop rdi
pop rsi
pop rdx
pop rcx
pop rax
push 0x4049a0 ; jump to original entry point
ret
hello: db "Hey LinuxBaya!",33,10
len : dd 15
The first few assembly instructions save the rax, rcx, rdx, rsi, and rdi registers by pushing them onto the stack. The next instructions set up the arguments for a sys_write system call, which will print hey linuxbaya! to the screen. For sys_write, the syscall number is 1(which is placed in rax), and there are three arguments: the file descriptor to write to (1 for stdout), a pointer to the string to print, and the length of the string. Now that all the arguments are prepared, the syscall instruction invokes the actual system call, printing the string. After invoking the sys_write system call, the code restores the registers to their previously saved state. It then pushes the address 0x4049a0 of the original entry point (which can be found using readelf -h <binary>) and returns to that address, starting execution of the original program.
To make the code suitable for injection, we need to assemble it into a raw binary file that contains nothing more than the binary encodings of the assembly instructions and data. To assemble hello.s into a raw binary file, we will use the nasm assembler’s -f bin option, as shown below.
This creates the file hello.bin, which contains the raw binary instructions and data suitable for injection.
Injection of code section:-
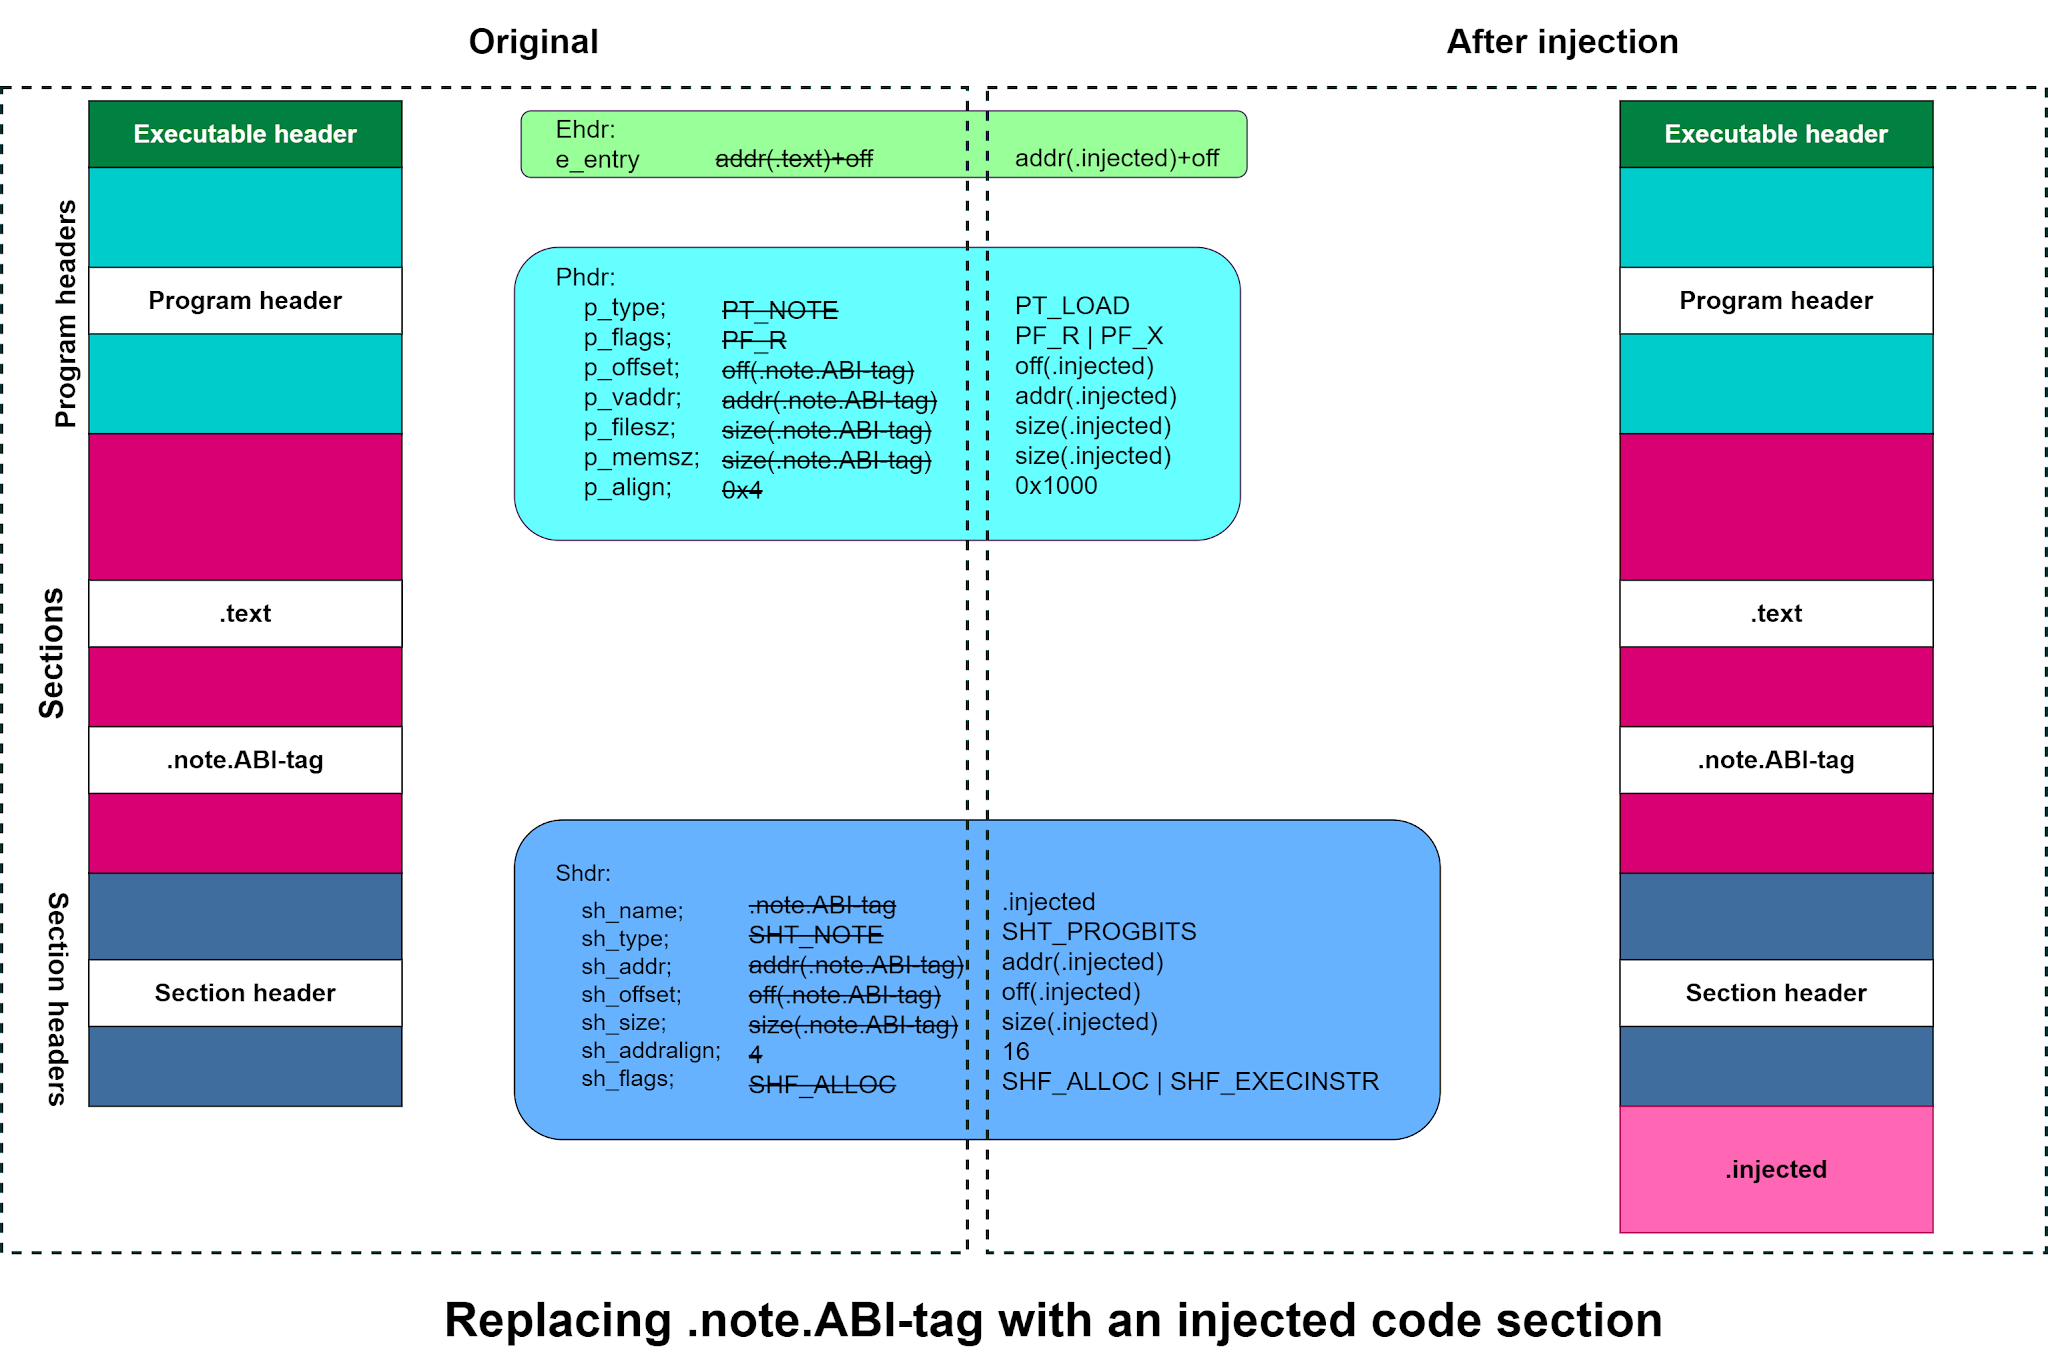
There is one existing program header that we can always safely overwrite is the PT_NOTE header, which describes the PT_NOTE segment containing auxiliary information about the binary. For example, it’s a GNU/Linux binary, kernel version required for binary, and so on. The PT_NOTE segment contains this information in two sections called .note.ABI-tag and .note.gnu.build-id. If this information is missing, the loader simply assumes it’s a native binary, so it’s safe to overwrite the PT_NOTE header without fear of breaking the binary. This trick is commonly used by malicious parasites to infect binaries.
Changes required for Section Header:-
1. The sh_name from .note.ABI-tag to .injected and sh_type from SHT_NOTE to SHT_PROGBITS to denote that the header now describes a code section.
2. Change the sh_addr, sh_offset, and sh_size fields to describe the location and size of the new .injected section instead of the .note.ABI-tag section.
3. Change the section alignment (sh_addralign) to 16 bytes to ensure that the code will be properly aligned when loaded into memory, and add the SHF_EXECINSTR flag to the sh_flags field to mark the section as executable.
And for Program Header:-
1. Change the p_type from PT_NOTE to PT_LOAD to indicate that the header now describes a loadable segment. So the loader will load the segment into memory when the program starts.
2. Change the required address, offset, and size fields: p_offset, p_vaddr (and p_paddr, not shown), p_filesz, and p_memsz.
3. Set p_flags to mark the segment as readable and executable, instead of just readable.
4. Fix the alignment (p_align). And it’s nice to also update the string table to rename the old .note.ABI-tag section to .injected.
To make all the above changes, I am using a tool called elfenject, which is implemented using libelf, a popular open-source library for parsing ELF binaries.
 |
| List of sections in an injected executable ELF |
We have perfectly injected a code section into an existing binary and it is also noticeable that the section header ".note.ABI-tag" is missing which is actually replaced by the ".injected" section header. So finally we hack one binary. But still, the new injected code will never run unless we redirect some calls from the original .text section to injected code. The idea is something similar to an interrupt call, first set the starting address of the injected section where we want to call the injected code, then after complete execution of injected code, we need to transfer the call to the next address of the original binary for which we need to set a return call.
1. Entry point hacking:-
Above picture, I changed the e_Entry field in the ELF executable header to point to an address in the new .injected section instead of the original entry point, which is usually somewhere in the .text, which we must call after returning from the injected code. For this, we will open the Assembly file and there we add a line to the end of the file before return.

If we see the address of the injected section in the section header with readelf -h ls.entry, it is exactly the same as mentioned in the Executable header.
 |
| The output of a modified binary |
This creates the file hello.bin, which contains the raw binary instructions and data suitable for injection. Now let’s use elfinject to inject this file and redirect the ELF entry point using a hex editor so that the injected code runs on startup of the binary.
There is another technique called constructor/destructor hijacking that allows the injected code to run only once at startup or at the termination of the binary. For this, we don't need the hardcoded original entry address ( push 0x4049a0 ) in hello.s file. And just replace the next address of ".init_array" or ".fini_array" section with injected section entry address (800e78) using hexedit.
 |
| Entry point of section .init_array and .fini_array |
If we want to invoke the injected function repeatedly, then we need to hack a GOT or PLT entry to replace a library call with an injected function.
2. Hack .GOT section:-
With GOT hijacking, we'll completely replace a library function, so there’s no need to transfer control back to the original implementation when the injected code completes. Thus, the assemblly shouldn’t contain any hard-coded address to which it transfers control at the end. It simply ends with a normal return. Let’s take a look at how to implement the GOT hijacking technique in practice.
 |
| Use of tool elfinject with option -1 |
Remove the instruction "push 0x4049a0" from the hello.s file and make a fresh hello.bin file using nasm tool as shown in the above picture and create a fresh copy of ls and inject our code into it.
 |
| Part of PLT section |
Now we can use objdump to view the binary’s PLT entries (where the GOT entries are used) and find the one for fwrite_unlocked that is responsible for sys_write system call. It starts at address 0x402800, and the GOT entry it uses is located at address 0x61e2a0, which is in the .got.plt section. Using objdump to view the .got.plt section, you can see the original address stored in the GOT entry: 402806 (encoded in little-endian format).
 |
| After and before modifying the .got.plt section |
As explained in part-3 lazy binding concept, this is the address of the next instruction in fwrite_unlocked’s PLT entry, which we want to overwrite with the address of the injected code. Open the ls.got file with hexedit and search for string 062840 and replace it with 780e80 (0x800e78). After changing the GOT entry to point it into our “Hey LinuxBaya!” function, the ls program now prints “Hey LinuxBaya!” every time it invokes fwrite_unlocked, replacing all of the usual ls output with copies of the “Hey LinuxBaya!” string. Of course, in real life, you’d want to replace fwrite_unlocked with a more useful function.
 |
| The output of modified binary |
A benefit of GOT hijacking is that it’s straightforward and .got.plt is writable at runtime. As a result, GOT hijacking is a popular technique for exploits that aim to change the behavior of a running process (Ex:- Dynamic Instrumentation).
Instead of changing the function address stored in a GOT entry used by a PLT stub, you change the PLT stub itself. Because this technique involves changing the PLT, which is a code section, it’s not suitable for modifying a binary’s behavior at runtime.
3. Redirecting Direct and Indirect Calls:-
So far, we’ve learned how to run injected code at the start or end of a binary or when a library function is invoked. But when we want to use an injected function to replace a nonlibrary function, hijacking a GOT or PLT entry doesn’t work. In that case, we can use a disassembler to locate the calls we want to modify and then overwrite them, using a hex editor to replace them with calls to the injected function instead of the original.
The hex editing process is the same as for modifying a PLT entry. When redirecting an indirect call (as opposed to a direct one), the easiest way is to replace the indirect call with a direct one. However, this isn’t always possible since the encoding of the direct call may be longer than the encoding of the indirect call. In that case, we’ll first need to find the address of the indirectly called function that we want to replace, for instance, by using gdb to set a breakpoint on the indirect call instruction and inspecting the target address.
Once we know the address of the function to replace, we can use objdump or a hex editor to search for the address in the binary’s .rodata section. If we're lucky, this may reveal a function pointer containing the target address. We can then use a hex editor to overwrite this function pointer, setting it to the address of the injected code. If we're unlucky, the function pointer may be computed in some way at runtime, requiring more complex hex editing to replace the computed target with the address of the injected function.


